Custom Github App
This page details how to install Port's GitHub integration using a custom GitHub App, which provides automatic access token rotation.
This page outlines the following steps:
- How to create a new app in your GitHub organization;
- How to install the GitHub app in your GitHub organization and select repositories.
- How to deploy the integration in the configuration that fits your use case.
Prerequisites
- A GitHub account with permissions to create and manage GitHub Apps in your organization. This typically requires being an Organization Owner or having the "App Manager" role.
- Your Port user role is set to
Admin.
Create a GitHub app
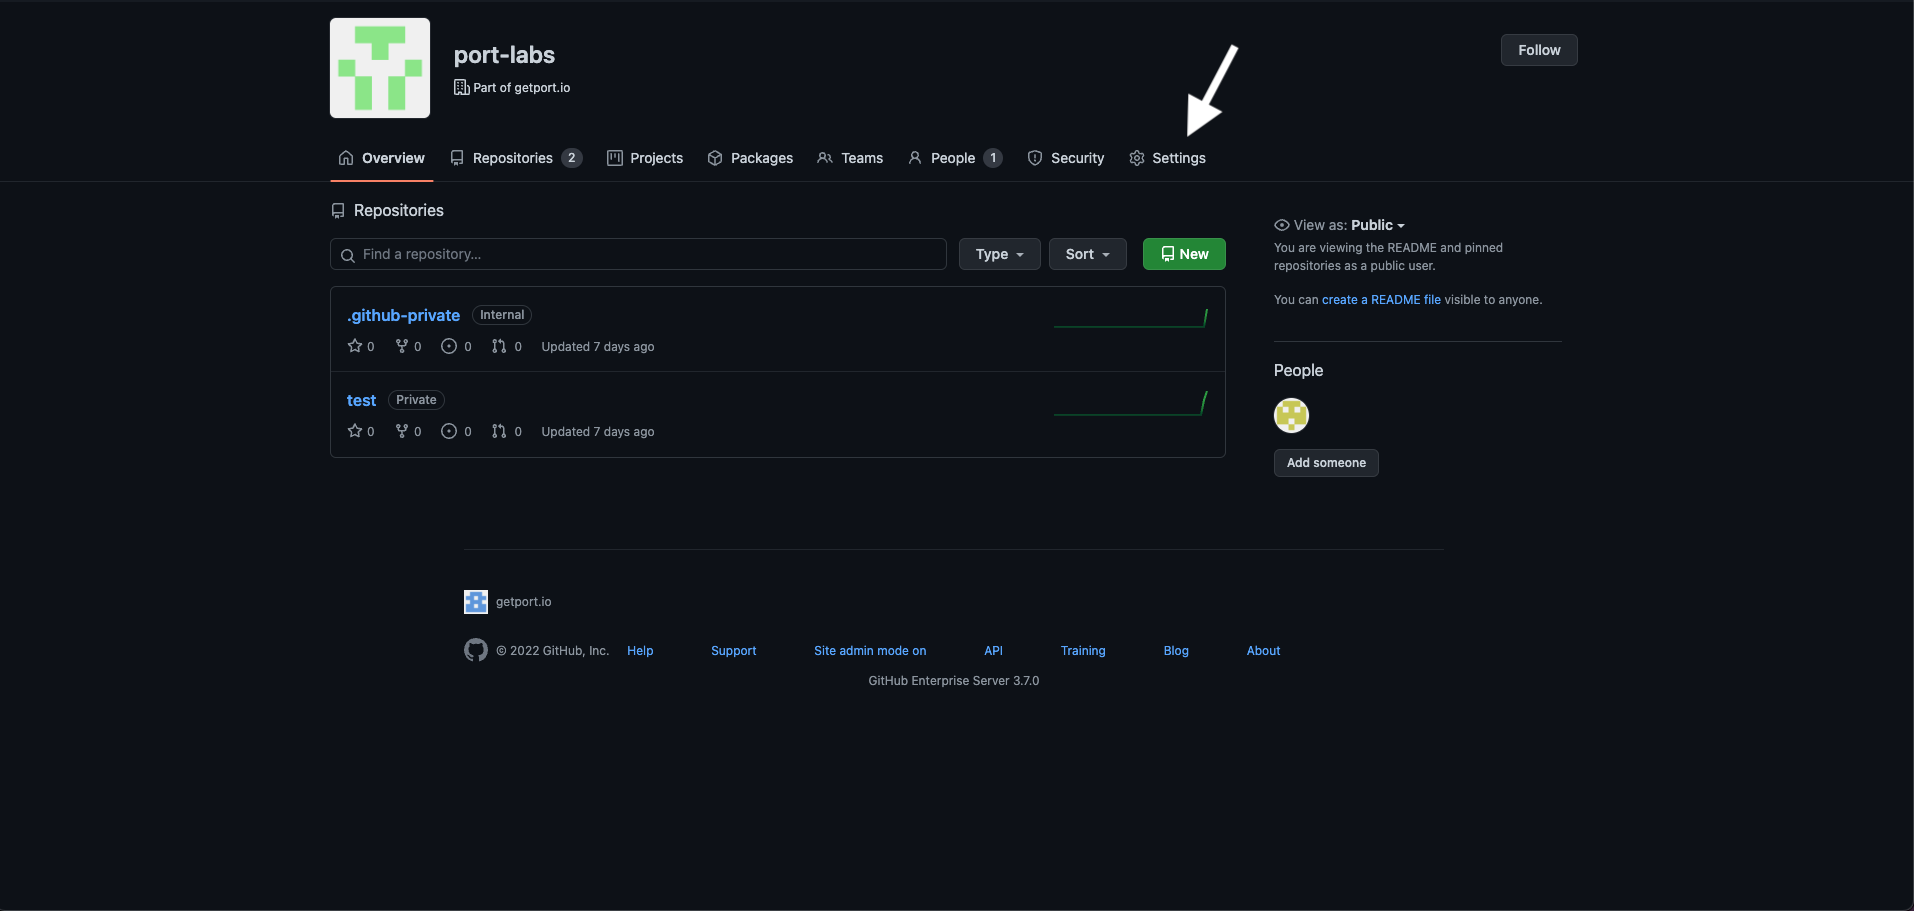
- Navigate to your Github organization and click on Settings:
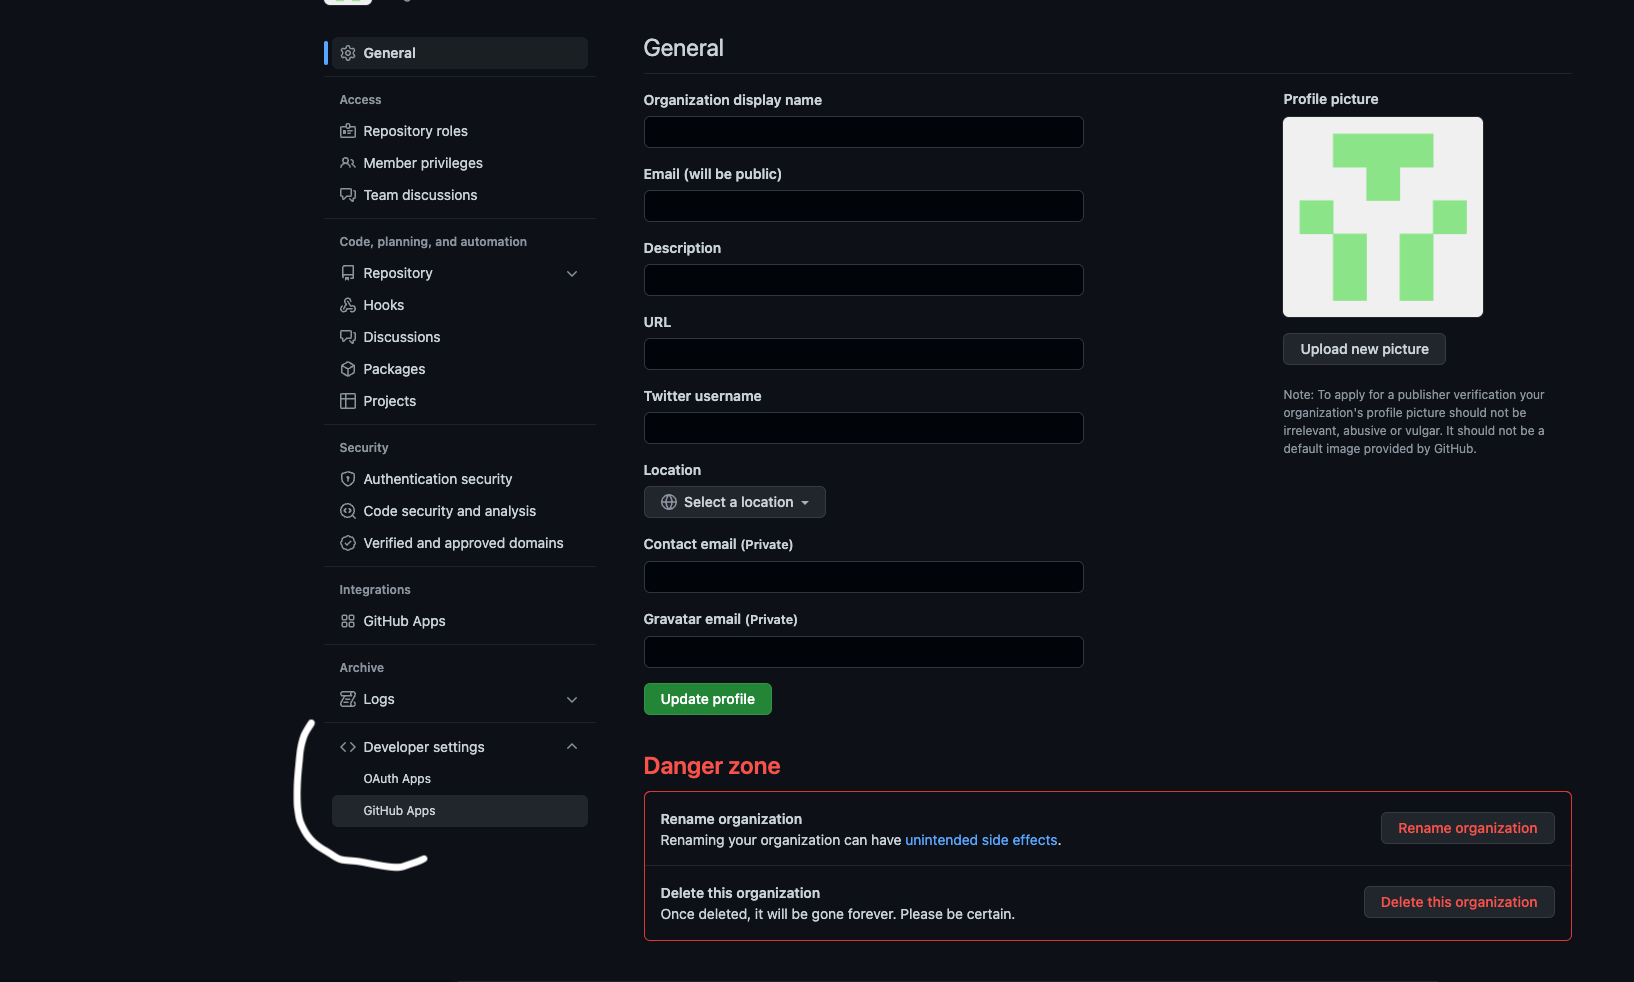
- Inside the settings view, click on Developer Settings -> and then select GitHub Apps:
- Click on "New GitHub App":

- Insert the following properties:
- GitHub App name: Choose a unique name for the app. Note that GitHub App names must be globally unique.
- Homepage URL: https://port.io
- Callback URL: Leave this empty.
- Setup URL: Leave this empty.
- Uncheck Active under Webhooks. The integration will automatically create the webhook if you configure the
OCEAN__BASE_URLvariable later during deployment. - Repository Permissions:
- Actions: Readonly (for syncing Workflows).
- Checks: Readonly (for syncing
Port.yml). - Contents: Readonly (for reading port configuration files and repository files).
- Metadata: Readonly.
- Administration: Readonly (for syncing collaborators)
- Pull Request: Readonly
- Code scanning alerts: Readonly
- Dependabot alerts: Readonly
- Deployments: Readonly
- Environments: Readonly
- Organization Permissions:
- Members: Readonly (for syncing members and teams).
- Administration: Readonly(for syncing external identities)
- Webhooks: Read and Write (to allow the integration create webhook).
Then select "Create GitHub App"
- Go to the
Private keysat the bottom of theGeneralsettings page:
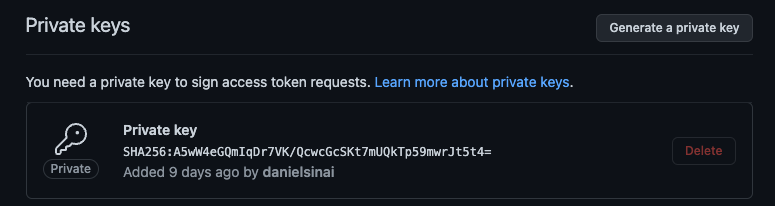
Keep the file, you will need it for the deployment step.
Installing GitHub App
After you have the app registered in your organization, you can install it and select the repositories to integrate it with:
- First, navigate to your organization and click on Settings:
- Inside the settings view, click on Developer Settings -> and then select GitHub Apps:
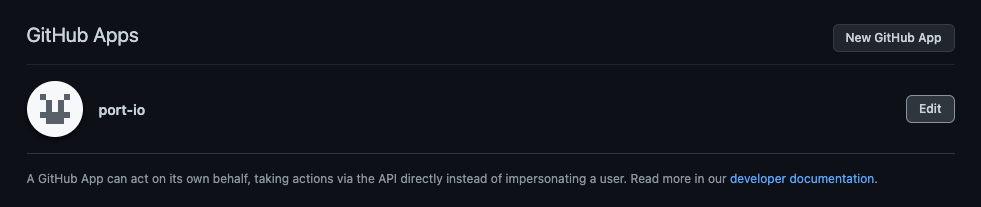
- Click
editon the GitHub app created at the step before:
-
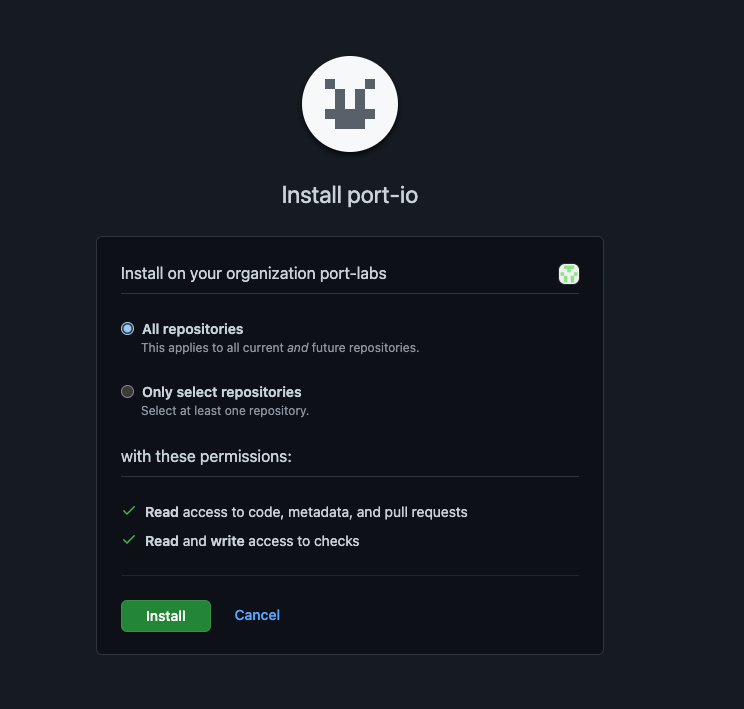
Go to Install App -> and select the installation button on your wanted organization;
-
Choose the repositories you want the integration to be installed for:
Deploy the integration
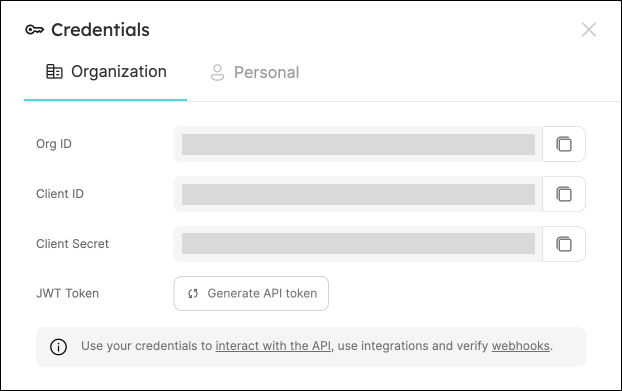
To deploy the integration, you will need your Port CLIENT_ID and CLIENT_SECRET.
To get your Port credentials, go to your Port application, click on the ... button in the top right corner, and select Credentials. Here you can view and copy your CLIENT_ID and CLIENT_SECRET:
Choose the installation method that best suits your needs:
- Hosted by Port
- Kubernetes
- Docker
Using this installation option means that the integration will be hosted by Port, with a customizable resync interval to ingest data into Port.
Live event support
This integration supports live events, allowing real-time updates to your software catalog without waiting for the next scheduled sync.
Supported live event triggers (click to expand)
repository:
- created
- edited
- renamed
- transferred
- unarchived
- publicized
- privatized
- archived
- deleted
pull_request:
- opened
- edited
- ready_for_review
- reopened
- synchronize
- unassigned
- review_request_removed
- closed
issues:
- assigned
- closed
- demilestoned
- edited
- labeled
- locked
- milestoned
- opened
- pinned
- reopened
- transferred
- typed
- unassigned
- unlabeled
- unlocked
- unpinned
- untyped
- deleted
release:
- created
- edited
- deleted
create
delete
push
deployment
deployment_status
workflow_run:
- in_progress
- requested
- completed
dependabot_alert:
- created
- reopened
- auto_reopened
- reintroduced
- dismissed
- auto_dismissed
- fixed
code_scanning_alert:
- appeared_in_branch
- reopened
- created
- fixed
- closed_by_user
organization:
- member_added
- member_removed
team:
- created
- edited
- deleted
- added_to_repository
membership:
- added
- removed
member:
- added
- edited
- removed
secret_scanning_alert:
- created
- publicly_leaked
- reopened
- validated
- resolved
Alternatively, you can install the integration using the Self-hosted method to update Port in real time using webhooks.
Installation
To install, follow these steps:
-
Go to the Data sources page of your portal.
-
Click on the
+ Data sourcebutton in the top-right corner. -
Click on the relevant integration in the list.
-
Under
Select your installation method, chooseHosted by Port. -
Configure the
integration settingsandapplication settingsas you wish (see below for details).
Application settings
Every integration hosted by Port has the following customizable application settings, which are configurable after installation:
-
Resync interval: The frequency at which Port will ingest data from the integration. There are various options available, ranging from every 1 hour to once a day. If a sync is still in progress when the next one is due, the new sync will be skipped (up to 24 hours delay).
This ensures that all kinds are fully synchronized and that cleanup of stale entities always takes place at the end of each sync. -
Send raw data examples: A boolean toggle (enabledby default). If enabled, raw data examples will be sent from the integration to Port. These examples are used when testing your mapping configuration, they allow you to run yourjqexpressions against real data and see the results.
Integration settings
Every integration has its own tool-specific settings, under the Integration settings section.
Each of these settings has an ⓘ icon next to it, which you can hover over to see a description of the setting.
Port secrets
Some integration settings require sensitive pieces of data, such as tokens.
For these settings, Port secrets will be used, ensuring that your sensitive data is encrypted and secure.
When filling in such a setting, its value will be obscured (shown as ••••••••).
For each such setting, Port will automatically create a secret in your organization.
To see all secrets in your organization, follow these steps.
Limitations
- The maximum time for a full sync to run is based on the configured resync interval. For very large amounts of data where a resync operation is expected to take longer, please use a longer interval.
Port source IP addresses
When using this installation method, Port will make outbound calls to your 3rd-party applications from static IP addresses.
You may need to add these addresses to your allowlist, in order to allow Port to interact with the integrated service:
- Europe (EU)
- United States (US)
54.73.167.226
63.33.143.237
54.76.185.219
3.234.37.33
54.225.172.136
3.225.234.99
Using this installation option means that the integration will be able to update Port in real time using webhooks.
Prerequisites
To install the integration, you need a Kubernetes cluster that the integration's container chart will be deployed to.
Please make sure that you have kubectl and helm installed on your machine, and that your kubectl CLI is connected to the Kubernetes cluster where you plan to install the integration.
If you are having trouble installing this integration, please refer to these troubleshooting steps.
For details about the available parameters for the installation, see the table below.
- Helm
- ArgoCD
To install the integration using Helm:
Add Port's Helm chart repository:
helm repo add --force-update port-labs https://port-labs.github.io/helm-charts
Install the Helm chart:
- Create a
values.yamlfile with the following content:
port:
  clientId: "<PORT_CLIENT_ID>"
  clientSecret: "<PORT_CLIENT_SECRET>"
  baseUrl: "https://api.port.io"

integration:
  identifier: "github-ocean"
  type: "github-ocean"
  version: "1.2.0-beta"
  eventListener:
    type: "POLLING"
  config:
    githubOrganization: "<GITHUB_ORGANIZATION>"
    githubHost: "<GITHUB_HOST>" # e.g https://api.github.com
    githubAppId: "<GITHUB_APP_ID>" # app client id also works
  secrets:
    githubAppPrivateKey: "<BASE_64_ENCODED_PRIVATEKEY>"

# uncomment to enable live events or to support actions processing
# liveEvents:
#   baseUrl: "<your-domain>"

# uncomment to enable actions processing
# actionsProcessor:
#   enabled: true

initializePortResources: true
sendRawDataExamples: true
scheduledResyncInterval: 360
- Install the Helm chart using the
values.yamlfile:
helm upgrade --install github-ocean port-labs/port-ocean -f values.yaml
See all available helm options
The port_region, port.baseUrl, portBaseUrl, port_base_url and OCEAN__PORT__BASE_URL parameters are used to select which instance of Port API will be used.
Port exposes two API instances, one for the EU region of Port, and one for the US region of Port.
- If you use the EU region of Port (https://app.port.io), your API URL is
https://api.port.io. - If you use the US region of Port (https://app.us.port.io), your API URL is
https://api.us.port.io.
To install the integration using ArgoCD:
- Create a
values.yamlfile inargocd/my-ocean-github-integrationin your git repository with the content:
Be sure to replace the <GITHUB_TOKEN> and <GITHUB_ORGANIZATION> placeholders with your actual values. If you are using a self-hosted GitHub instance, update the githubHost value to point to your instance.
For multi-organization support, use a classic PAT token and specify multiple organizations in the port mapping
deleteDependentEntities: true
createMissingRelatedEntities: true
enableMergeEntity: true
organizations:
  - org1
  - org2
# ... rest of your mapping (repositoryType, resources, etc.) ...
initializePortResources: true
scheduledResyncInterval: 120
integration:
  identifier: my-ocean-github-integration
  type: github-ocean
  version: 1.2.0-beta
  eventListener:
    type: POLLING
  config:
    githubHost: https://api.github.com # Or your self-hosted GitHub URL
    githubOrganization: "<GITHUB_ORGANIZATION>" # your github organization, e.g port-labs
  secrets:
    githubToken: "<GITHUB_TOKEN>"

# uncomment to enable live events
# liveEvents:
#  baseUrl: "<your-domain>"
- Install the
my-ocean-github-integrationArgoCD Application by creating the followingmy-ocean-github-integration.yamlmanifest:
Remember to replace the placeholders for YOUR_PORT_CLIENT_ID YOUR_PORT_CLIENT_SECRET and YOUR_GIT_REPO_URL.
Multiple sources ArgoCD documentation can be found here.
ArgoCD Application
apiVersion: argoproj.io/v1alpha1
kind: Application
metadata:
  name: my-ocean-github-integration
  namespace: argocd
spec:
  destination:
    namespace: my-ocean-github-integration
    server: https://kubernetes.default.svc
  project: default
  sources:
  - repoURL: 'https://port-labs.github.io/helm-charts/'
    chart: port-ocean
    targetRevision: 0.9.5
    helm:
      valueFiles:
      - $values/argocd/my-ocean-github-integration/values.yaml
      parameters:
        - name: port.clientId
          value: <YOUR_PORT_CLIENT_ID>
        - name: port.clientSecret
          value: <YOUR_PORT_CLIENT_SECRET>
        - name: port.baseUrl
          value: https://api.getport.io
  - repoURL: <YOUR_GIT_REPO_URL>
    targetRevision: main
    ref: values
  syncPolicy:
    automated:
      prune: true
      selfHeal: true
    syncOptions:
    - CreateNamespace=true
The port_region, port.baseUrl, portBaseUrl, port_base_url and OCEAN__PORT__BASE_URL parameters are used to select which instance of Port API will be used.
Port exposes two API instances, one for the EU region of Port, and one for the US region of Port.
- If you use the EU region of Port (https://app.port.io), your API URL is
https://api.port.io. - If you use the US region of Port (https://app.us.port.io), your API URL is
https://api.us.port.io.
- Apply your application manifest with
kubectl:
kubectl apply -f my-ocean-github-integration.yaml
On MacOS and Linux you can get base64 encoded private key by using:
base64 -i <path/to/downloaded/private_key.pem>
You can accomplish the same on Windows using Powershell:
[Convert]::ToBase64String([IO.File]::ReadAllBytes("path\to\downloaded\private_key.pem"))
Online: https://www.base64encode.org/
Enabling live-events
The liveEvents.baseUrl parameter is used specifically to enable the real-time functionality of the integration.
For debugging, services like Ngrok can provide a temporary public URL. For production, a stable and publicly accessible host is required.
If it is not provided, the integration will continue to function correctly. In such a configuration, to retrieve the latest information from the target system, the scheduledResyncInterval parameter has to be set, or a manual resync will need to be triggered through Port's UI.
This integration supports live events, allowing real-time updates to your software catalog without waiting for the next scheduled sync.
The repository: pull_request: issues: release: create delete push deployment deployment_status workflow_run: dependabot_alert: code_scanning_alert: organization: team: membership: member: secret_scanning_alert:liveEvents.baseUrl specifies the public-facing URL for your integration. This URL, which must be reachable from the internet, is used to receive real-time updates from Github. It can be a public IP address or a configured domain name (e.g., https://mygithubintegration.com).Supported live event triggers
This table summarizes the available parameters for the installation.
| Parameter | Description | Required |
|---|---|---|
port.clientId | Your Port client ID. | ✅ |
port.clientSecret | Your Port client secret. | ✅ |
port.baseUrl | Your Port API URL (https://api.getport.io for EU, https://api.us.getport.io for US). | ✅ |
integration.identifier | A unique identifier for your integration. | ✅ |
integration.type | The integration type. | ✅ |
integration.eventListener.type | The event listener type. | ✅ |
integration.config.githubOrganization | Single GitHub organization name to sync data from (for GitHub App or Fine-grained PAT). Required for single-org authentication. | ❌ |
integration.config.githubHost | The API endpoint for your GitHub instance. For GitHub Enterprise Cloud, this will be https://api.<SUBDOMAIN>.ghe.com. Defaults to https://api.github.com if not provided. | ❌ |
scheduledResyncInterval | The number of minutes between each resync. | ❌ |
initializePortResources | When true, the integration will create default blueprints and port-app-config.yml mapping. | ❌ |
sendRawDataExamples | When true, sends raw data examples from the third-party API to Port for testing and managing the integration mapping. | ❌ |
liveEvents.baseUrl | The base url of the instance where the GitHub integration is hosted, used for real-time updates (e.g. https://mygithuboceanintegration.com). Required if you want to enable live-events or actions processing. | ❌ |
actionsProcessor.enabled | when set to true, the integration will be able to process actions and automations. | ❌ |
integration.config.webhookSecret | A secret to secure webhooks from GitHub. This is optional but highly recommended for security if you enable live-events. | ❌ |
integration.config.githubAppId | The app id or client id of your GitHub App. Required if you are authenticating as a GitHub App instead of using a PAT. | ❌ |
integration.secrets.githubAppPrivateKey | The base64 encoded private key of your GitHub App. Required if you are authenticating as a GitHub App. | ❌ |
For advanced configuration such as proxies or self-signed certificates, click here.
Our integration can be directly run as a docker container, it can be deployed on any platform that allows deploying images as containers such as: K8S, ECS, AWS App Runner, etc.
You can pull the Docker image by running:
docker pull ghcr.io/port-labs/port-ocean-github-ocean:1.2.0-beta
Run the following command to start the app:
docker run \
-e OCEAN__PORT__CLIENT_ID="<PORT_CLIENT_ID>" \
-e OCEAN__PORT__CLIENT_SECRET="<PORT_CLIENT_SECRET>" \
-e OCEAN__PORT__BASE_URL="https://api.getport.io" \
-e OCEAN__BASE_URL="<https.example.com>" \ #optional, only required if you want to enable live-events or actions processing
-e OCEAN__ACTIONS_PROCESSOR__ENABLED=true \ #optional, only required if you want to enable actions processing
-e OCEAN__EVENT_LISTENER__TYPE="POLLING" \
-e OCEAN__INTEGRATION__CONFIG__GITHUB_HOST="<GITHUB_HOST>" \ # e.g https://api.github.com
-e OCEAN__INTEGRATION__CONFIG__GITHUB_ORGANIZATION="<GITHUB_ORGANIZATION>" \
-e OCEAN__INTEGRATION__IDENTIFIER="github-ocean" \
-e OCEAN__INTEGRATION__CONFIG__GITHUB_APP_ID="<GITHUB_APP_ID>" \ # client id also works
-e OCEAN__INTEGRATION__CONFIG__GITHUB_APP_PRIVATE_KEY="<BASE_64_ENCODED_PRIVATEKEY>" \
-p 8000:8000 \
ghcr.io/port-labs/port-ocean-github-ocean:latest
The command above contains placeholder values in angle brackets (e.g., <PORT_CLIENT_ID>). Be sure to replace them with your actual values before running the command.
On MacOS and Linux you can get base64 encoded private key by using:
base64 -i <path/to/downloaded/private_key.pem>
You can accomplish the same on Windows using Powershell:
[Convert]::ToBase64String([IO.File]::ReadAllBytes("path\to\downloaded\private_key.pem"))
Online: https://www.base64encode.org/
| Env variable | Description | Required |
|---|---|---|
OCEAN__PORT__CLIENT_ID | Port client id for interacting with the API | ✅ |
OCEAN__PORT__CLIENT_SECRET | Port client secret for interacting with the API | ✅ |
OCEAN__PORT__BASE_URL | Port's API Base URL | ✅ |
OCEAN__BASE_URL | The base url of the instance where the GitHub integration is hosted, used for real-time updates (e.g. https://mygithuboceanintegration.com). | ❌ |
OCEAN__ACTIONS_PROCESSOR__ENABLED | when set to true, the integration will be able to process actions and automations | ❌ |
OCEAN__INTEGRATION__CONFIG__WEBHOOK_SECRET | A secret to secure webhooks from GitHub. This is optional but highly recommended for security if you enable live-events. | ❌ |
OCEAN__EVENT_LISTENER__TYPE | Define the appropriate event listener type to handle incoming events and resync requests from Port. This listener will forward the events to the GitHub Ocean integration. For more details, see the Port Event Listener documentation | ✅ |
OCEAN__INTEGRATION__CONFIG__GITHUB_HOST | The API endpoint for your GitHub instance. For GitHub Enterprise, this will be https://api.<SUBDOMAIN>.ghe.com. Defaults to https://api.github.com if not provided. | ❌ |
OCEAN__INTEGRATION__CONFIG__GITHUB_ORGANIZATION | Single GitHub organization name to sync data from a single organization. Required for single-org authentication. | ❌ |
OCEAN__INTEGRATION__IDENTIFIER | A unique identifier for the integration instance. Useful if you are running multiple self-hosted GitHub integrations. Defaults to github-ocean. | ✅ |
OCEAN__INTEGRATION__CONFIG__GITHUB_APP_ID | App id or client id. You can find it in the edit GitHub app page. | ✅ |
OCEAN__INTEGRATION__CONFIG__GITHUB_APP_PRIVATE_KEY | A base64 encoded Github app private key. | ✅ |
The port_region, port.baseUrl, portBaseUrl, port_base_url and OCEAN__PORT__BASE_URL parameters are used to select which instance of Port API will be used.
Port exposes two API instances, one for the EU region of Port, and one for the US region of Port.
- If you use the EU region of Port (https://app.port.io), your API URL is
https://api.port.io. - If you use the US region of Port (https://app.us.port.io), your API URL is
https://api.us.port.io.